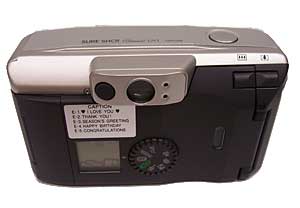
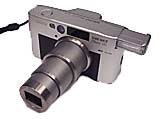
Canon Sure-shot Classic 120

Instructions taken and translated?! from this Russian page.

Page #4 of 4.

Start Here #1 - Page #2 - Page #3 - Page #4

  Page #4.    


  SETTING THE DATE and TIME    


After the replacement of the batteries or when you are on a foreign trip (in another time zone), you will set or change the date and time, following the indicated below order.

  • To press on the buttons "SELECT" and "SET" always use protrusion on the buckle of camera strap.

    Installation of the date

  • 1. Derive on the display only date.
    Press on the button "DATE", in order to derive only date on the display.
  • 2. Select the number of date.
  • Press on the button "SELECT", in order to select the number to change. The selected number (blinks) changes consecutively: yr-month- day etc, with each press of the button.
  • 3. You will establish date.
  • Press on the button"SET", " in order to establish date.
  • Repeat steps 2 and 3, in order to establish all numbers of date. When you press on the button "SELECT", and no number blinks, the installation of date is completed.

    Time setting.
  • 4. Derive on the display date and time.
  • Press on the button "DATE", in order to derive date and time on the display.
  • The installation of the time is impossible, when on the display there is only the date showing, so be sure the display shows date and time.
  • 5. Select the number of time. .
  • Press on the button "SELECT", to select the number to change.
  • The selected number (blinks) and changes consecutively: hour-minute-second.
  • 6. You will fix time.
  • Press on the button "SET", in order to fix time.
  • When you Press on the button "SELECT", and the colon (:) it does not blink, time setting is completed.

    MORE INFO
  • If after the replacement of the batteries instead of the date and time on LCD display there are three blinking lines ("- - -") (indicating that, that the function of the press date and time is switched off), you will have to carry out steps 2, 3, 5 and 6, to establish the date and time again.
  • If a button is pressed for more than two seconds, the number will change continuously.
  • If you press on the "SET" button, when the colon ":" is blinking, the seconds are set to zero.


  <top of page>      

  PRINTING OF DATE and TIME.   PRINTING OF THE CAPTIONS.  
 

You can imprint the date and time, when photograph is made, in the bottom right of the photograph.
  • Select the combination of "date/time" to be printed.
  • The combination "date/time" changes with each press on the "DATE" button
  • The different combinations which can be displayed are:
    Year/Month/Day
    Month/Date/Year
    Day/Month/Year
    Day/Hour/Minutes (TIME)
    Nothing it is printed


Selection of inscription.

  • Press on the button CAPTION.
  • The number of inscription changes with each press on the CAPTION button .
  • Make photograph, when the desired code number of inscription is shown on the display .

    ATTENTION !
  • Use 12, 24 or 36 exp film with DX code. If you use a film with another number of shots, the date or inscription in the last photographs can not take place.

    MORE INFO
  • In order to imprint only inscription, press on the button "DATE" until, the lines "- - -" appear on the display of date, and then select inscription.
  • 1. Press on the button CAPTION.
  • The number of inscription is shown on the LCD display.
  • 2. Press on the button SELECT.
  • With each press on the button "SELECT" the language of the printed inscription changes consecutively :
    E(English ),
    F (French),
    D (German),
    ES (Spanish).
  • In order to press on the button SELECT, always use protrusion on the buckle of strap.
    To cancel inscription.
  • Press on the button "DATE". The set inscription will disappear from the LCD display.


  <top of page>      

Shooting with the "optional" REMOTE CONTROL   Replacement of battery in the remote control.  
 

Use the remote control for firing the shutter, at distance up to 5 m from the camera

Device of remote control (RC-5)


The Top:

  • 1. the transmitting device.
  • 2. the button of the transmitting device.

The Bottom.

  • 3. the button to unlock the battery compartment.
  • 4. section for the battery.


1.
To set the camera into the remote control mode.

  • Press the button until the symbol appears on LCD panel.

2. Make a photograph.

  • Fix focusing and then arrange your shot. Then direct the transmitting device in the direction of sensor on the camera and press on the button of the transmitting device.
  • The lamp of the "red-eye" reduction blinks one time per second (or it burns with the use of the "red eye" reduction ), and on LCD panel is conducted counting, indicating that, that the camera obtained signal from the remote control.
  • The shutter operates in approximately 2 seconds.


Replace the battery when the shutter ceases to operate when pressing on the button of the remote control. Power source: one lithium small battery of the type CR 2032, 3V.

  • 1. Advance it cut off for the small battery.
  • Using an end of the pen or another similar pointed object (1), press on the button of unlocking, in order to advance the section (2).
  • 2. You will establish new small battery into the section and move it back into the remote control.
  • Be sure that, what is observed polarity of conclusions "+" and "-".

    ATTENTION !
  • shoot with remote control can become impossible, if the sensor of remote signal on the camera is subjected to direct sunlight or shining light. In this case use the self-timer or move the camera to another place.

    MORE INFO
  • shoot with the remote device is possible for approximately 4 minutes, when the symbol is set.
  • Place the camera on to a steady surface or use a tripod.

    ATTENTION !
  • The function of the fixed focus can be used, as with the usual shoot.


  <top of page>      

  QUESTIONS and ANSWERS.    
 
Is it possible to use slide film ?
Yes, it is possible, with exception of the shooting of objects at a distance of less than 0.6m in close up mode. It is recommended, however, to use 35 mm film with DX code and the sensitivity of ISO 25, 50,100, 200, 400, 800 or 1600.

What is the sensitivity of film (number ISO)?
ISO indicates the numerical value of the sensitivity of film to light. That is the higher the number, the more sensitive the film is to the light. The use of a film with the sensitivity of ISO 400 is recommended for normal photography.

Is it possible to use a film without a DX code?
Yes, it is possible. However, when a film without DX code is loaded into the camera, it is established the sensitivity of film ISO 25. After the charging of film with sensitivity ISO 25 or film without DX code shut rear cover and press on the shutter button one or two times?? ( does anybody know what this is meant to say? email me so I can fix it )


CAPTION


The Date, imprinted in my photographs, is almost imperceptible!!??
Too bright a background of that part of the photograph where date is printed can be reason. Try to arrange your photograph so, in that part,where date will be imprinted, a dark object is. Also avoid yellow and white objects there.


  <top of page>    


MALFUNCTIONS
MALFUNCTION POSSIBLE REASON METHOD OF THE ELIMINATION
This pictogram blinks on the LCD Panel () * The charge of batteries is reduced . * You will replace the batteries
On the LCD panel there is no pictogram () *batteries are not installed.
*batteries are installed with the incorrect polarity
*batteries are completely discharged
* you will install the new batteries
* you will correctly install the batteries
* you will install new batteries
Shutter does not operate *Dial selector is in the position "OFF"
* batteries are completely discharged
*The film is loaded incorrectly
* a used film remains in the camera
*shutter operates only after the ignition of the lamp of the "red-eye" reduction after approximately 1 second
* you will set dial selector to the necessary position
* you will replace the batteries
* you will load film anew
* extract film and you will load the new
* you hold the shutter button in the pressed position until, the shutter operates.
* you will use another setting of the flash
Photographs are illegible * with the use of shutter, the emitter and detector of the AF system was obstructed..
* during the photographing with the self-timer, pressing on the shutter button, you stood directly before the camera.
* camera moved when pressing the shutter button (effect of vibration).
* Do not obstruct the emitter and detector of the AF system with your hair, or fingers etc.
*Don't stand directly before the camera when pressing on the shutter button.
* press on the shutter button smoothly.
Symbol "N" is brought out on LCD display. *Ôóíêöèÿ ñàìîäèàãíîçà îáíàðóæèëà îøèáêó. ????? * extract batteries from the camera. When symbol "N" disappears from the LCD display, you will install new batteries.
Flash does not operate. * flash began to move into the camera. Try not to press on the flash.
<top of page>