Canon Sure-shot Classic 120
Instructions taken and translated?! from this Russian page.
Page #3 of 4.
|
Instructions taken and translated?! from this Russian page.
|
|||||||
|
|
|
|||||||
| Advanced Instructions (Page #3) | |||
|
|
|||
|
|
|
||
|
|
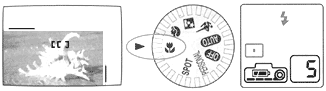
| •SHOOTING MOVING SUBJECTS. | |||
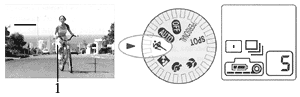 In this mode the Servo AF, constantly focuses on moving objects, and this mode also uses the continuous shooting function.
|
|||
| <top of page> |
| •SHOOTING AGAINST THE DARK BACKGROUND. | •SHOOTING PORTRAITS. | |||
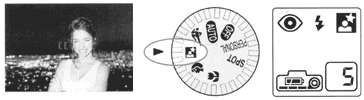 This mode uses a combination of long exposure times (to 4 s.) to capture the background, and the flash which illuminates the subject,
|
|
|||
| <top of page> |
|
|
•CLOSE-UP PHOTOGRAPHY.. | •SPOT MODE | |||||||||||
|
When the shooting distance is closer than 1 m/3.3ft, the image that is
seen through the viewfinder does not coincide with the image obtained
in the photograph and therefore the part of the photograph outside the
the close-up frame will be cut off. When photographing at distances at
1 m and less follow the steps below, using the close-up frame.
|
FOR
EXCESSIVELY LIGHT OR DARK SUBJECTS. 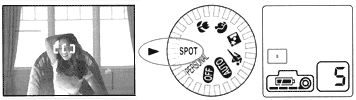 This mode makes it possible for you to focus and to establish exposure on to the center of the viewfinder. Make photograph, after directing the framework AF in the center to the object. This mode makes it possible for you to obtain a good photograph in strong
contrast illumination conditions, for example, when man is illuminated
by searchlight or is located on the mountain-skiing route.
|
||||||||||||
| •Effective use of "red-eye" reduction. | |||||||||||||
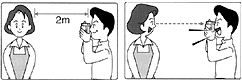 When you use a flash while photographing people under low illumination, their eyes sometimes glow red in the photograph. This phenomenon is called the "red eye" effect and it is caused by the light of the flash being reflected off the retina of the eye. In the "red-eye" reduction mode ( Take the picture within 2 m/6.6ft of your subject. Also attract the subjects attention and ensure they look at the camera. |
|||||||||||||
|
|
|
|
|||||||||||
| <top of page> |
| •'PERSONAL'MODE | •THE SETTINGS OF THE FLASH. | |||
|
SETTING THE USER CUSTOMISABLE
FUNCTIONS.
To select these functions you set the dial selector to the PERSONAL
position and use the buttons under the back flap. For example, in order
to select function "the flash OFF" with AF on the point in the center,
press the button (
|
|
|||
| <top of page> |
| •AUTO-FLASH without "RED EYE" REDUCTION. | •AUTO-FLASH with "RED EYE" REDUCTION | |||||||||||||||
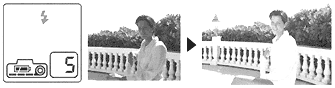
 Set this function for photographs without people in, or
during the photographing people without the use of a "red eye"
reduction lamp, when the instantaneous use of the shutter is necessary.
Under the conditions of backlighting or low illumination the flash operates
automatically with the press on the button of the shutter button. Set this function for photographs without people in, or
during the photographing people without the use of a "red eye"
reduction lamp, when the instantaneous use of the shutter is necessary.
Under the conditions of backlighting or low illumination the flash operates
automatically with the press on the button of the shutter button.
For the modes of |
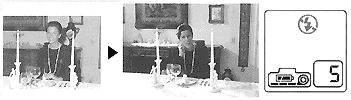
 Set this function, in order to decrease the effect of "red
eyes", when you photograph people under conditions of low illumination.
When you press on the shutter button, the lamp of the "red-eye"
reduction lights up, and then the flash operates. Set this function, in order to decrease the effect of "red
eyes", when you photograph people under conditions of low illumination.
When you press on the shutter button, the lamp of the "red-eye"
reduction lights up, and then the flash operates.
|
|||||||||||||||
| •FILL FLASH. | ||||||||||||||||
 While using this function the flash operates independently of illumination conditions. Use this function for fill flash in the daytime or for the softening of the outlines of the taken object.
|
||||||||||||||||
| <top of page> |
| •FLASH "OFF". | •FLASH "OFF." WITH EXPOSURE CORRECTION | |||
 This setting turns off the flash, however small illumination. Use this function for photographs against the background of the setting sun, in places, where the use of flash is forbidden or for shooting using available light . Press on the button |
 This camera is equipped with the function of automatic exposure
correction for shooting in backlighting conditions , but you can use this
function and any time. This camera is equipped with the function of automatic exposure
correction for shooting in backlighting conditions , but you can use this
function and any time.
|
|||
| <top of page> |

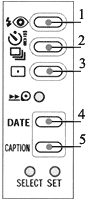 This mode makes it possible for you to select any combination
of functions, from "1" to "5", indicated in the figure,
to assign and to carry into the memory your own favourite style of shooting.
This mode makes it possible for you to select any combination
of functions, from "1" to "5", indicated in the figure,
to assign and to carry into the memory your own favourite style of shooting.